AwesomeWM Tutorial
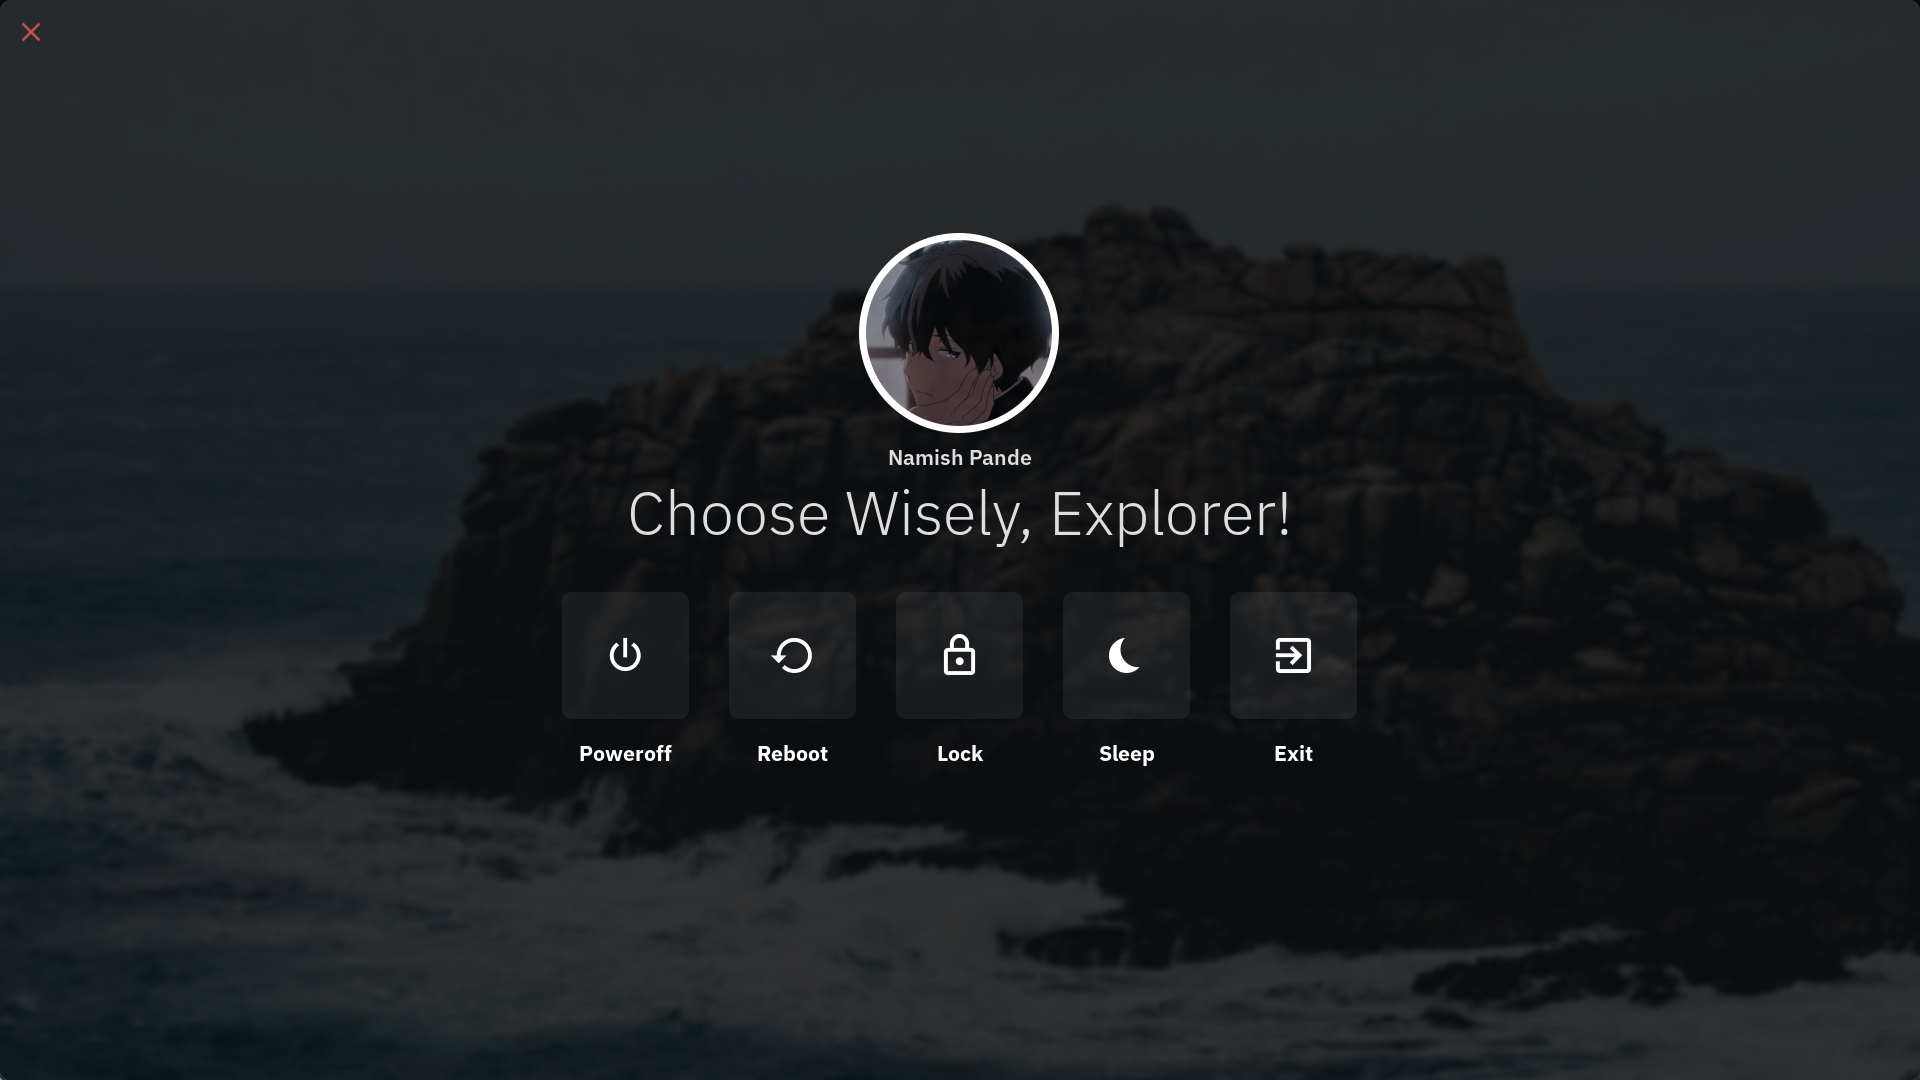
Table Of Contents
- Requirements and Setup
- Defining Commands
- Making A Simple Toggleable Display
- Creating The Elements
- Adding The Background Image
- Adding All The Elements Together
- Listening For Keypresses
- Final Code
Requirements and Setup
NOTE - This tutorial was made considering you have a basic experience is lua
This tutorial requires awesome-git and imagemagick. I am using nixos and if you use it too, you can install it via nixpkgs-f2k.
- make a
helpers.luafile with these functions
local helpers        = {}local gears          = require("gears")
helpers.rrect        = function(radius)  radius = radius or dpi(4)  return function(cr, width, height)    gears.shape.rounded_rect(cr, width, height, radius)  endend
helpers.colorizeText = function(txt, fg)  if fg == "" then    fg = "#ffffff"  end
  return "<span foreground='" .. fg .. "'>" .. txt .. "</span>"end
return helpers- have these in your
theme/init.luafile
local gfs                = require("gears.filesystem")local theme_path         = gfs.get_configuration_dir() .. "/theme/"
theme.sans               = "IBM Plex Sans"theme.icofont            = 'Material Design Icons'theme.wall               = "path to your wall"theme.bg                 = "#000000"theme.fg                 = "#ffffff"theme.err                = "#c14d53"theme.profilepicture     = theme_path .. "/path/to/pfp.jpg"theme.scrheight          = 1080theme.scrwidth           = 1920
So let us start without wasting any more time. You need some libraries to implement this. Add this on the top of your file:
local awful = require("awful")local wibox = require("wibox")local beautiful = require("beautiful")local dpi = beautiful.xresources.apply_dpilocal helpers = require("helpers")local gfs = require("gears.filesystem")Defining commands
- signals in awesome
awesome.connect_signal() : This function is used to create a callback for a specific signal. When that signal is called, the callback function is executed
awesome.emit_signal() : This function is used to trigger a signal. When this function is called, all the registered callbacks associated with it are called
This is an example of how signals work
-- creating a signalawesome.connect_signal("send::notification", function()    awful.spawn.with_shell("notify-send 'Hello World!' 'Notification from chadcat7'")end)
-- calling the signalawesome.emit_signal("send::notification")- awful.spawn()
awful.spawn is a function that allows the execution of external commands or programs. great thing about them is that they do not block io.popen like os.execute
-- launch firefoxawful.spawn.with_shell("firefox")Now that we have learned the basics of signals and spawn we can define our commands
local powerofficon = ""local rebooticon = ""local suspendicon = ""local exiticon = ""local lockicon = ""
local poweroffcommand = function() awful.spawn.with_shell("poweroff") awesome.emit_signal('hide::exit')end
local rebootcommand = function() awful.spawn.with_shell("reboot") awesome.emit_signal('hide::exit')end
local suspendcommand = function() awesome.emit_signal('hide::exit') awful.spawn.with_shell("systemctl suspend")end
local exitcommand = function() awesome.quit()end
local lockcommand = function() awesome.emit_signal('hide::exit') awesome.emit_signal('toggle::lock')endMaking A Simple Toggleable Display
- wibox
wibox is simple UI element in awesomewm that can be turned into anything you want. for now we want it to be a widget
awful.screen.connect_for_each_screen(function(s)  local exit = wibox({    screen = s,    width = beautiful.scrwidth,    height = beautiful.scrheight,    bg = beautiful.bg .. '00',    ontop = true,    visible = false,  })
  exit:setup {    layout = wibox.layout.stack  }  awful.placement.centered(exit)  awesome.connect_signal("toggle::exit", function()    exit.visible = not exit.visible  end)  awesome.connect_signal("show::exit", function()    exit.visible = true  end)  awesome.connect_signal("hide::exit", function()    exit.visible = false  end)end)
woah this is a lot of code, let us break down what happen
- awful.screen.connect_for_each_screen
well this is required to render your widget in all the screens you have
wibox
exit is the main the big widget that we are going to display on the screen. to set its background to transparent i have added 00 to the current background color
exit:setup is required to put widgets inside this widget to actually display something other than a blank box
awful.placement.centered places the widget at the center of the screen.
At the end you will see that I have used signals again. This time they are being used to make a signal for toggling the exit wibox.
To make this work with a keybind add this to your keybind files
awful.key { modifiers = { mod.super }, key = 'x', description = 'powermenu', group = 'awesome', on_press = function() awesome.emit_signal('toggle::exit') -- calling the signal end, },Creating the elements
To create widgets that we will add to our main wibox, we use wibox.widget. To make a button to close and open, we use:
local close = wibox.widget { { align = 'center', font = beautiful.icofont .. " 24", markup = helpers.colorizeText('', beautiful.err), widget = wibox.widget.textbox, }, widget = wibox.container.place, halign = 'left', buttons = { awful.button({}, 1, function() awesome.emit_signal('hide::exit') end) },}Exaplaining the code -
widget = wibox.container.place:
This tells us what type of widget are we trying to display. Every widget requires atleast 1 widget or layout property. wibox.container.place allows to place smaller widgets into larger space.
halign
Stands for horizontal alignment that can only be used with wibox.container.place. The left part should be pretty clear. (hint: it moves the element to the left side)
buttons
This is used to add mouse interactions. The 2nd argument specifies what type of argument. 1 means left click, 3 means right, 2 means middle, 4 means scroll up and 5 means scroll down. The third arguments lets us tell what we actually wanna execute.
Making all the buttons at once
Now instead of create 5 wibox.widgets, we can create one function to make them for us
local createButton    = function(icon, cmd, name)  local button = wibox.widget {    {      {        {          align = 'center',          font = beautiful.icofont .. " 35",          markup = helpers.colorizeText(icon, '#ffffff'),          widget = wibox.widget.textbox        },        margins = 40,        widget = wibox.container.margin      },      shape = helpers.rrect(10),      bg = '#ffffff' .. '10',      buttons = {        awful.button({}, 1, function()          cmd()        end)      },      widget = wibox.container.background    },    {      align = 'center',      font = beautiful.sans .. " Bold 16",      markup = helpers.colorizeText(name, '#ffffff'),      widget = wibox.widget.textbox    },    spacing = 20,    layout = wibox.layout.fixed.vertical  }  return buttonend


local poweroffbutton = createButton(powerofficon, poweroffcommand, "Poweroff")local rebootbutton = createButton(rebooticon, rebootcommand, "Reboot")local lockbutton = createButton(lockicon, lockcommand, "Lock")local suspendbutton = createButton(suspendicon, suspendcommand, "Sleep")local exitbutton = createButton(exiticon, exitcommand, "Exit")
Now we can add all of our elements in a single big element
local box = wibox.widget { { { { { { { image = beautiful.profilepicture, forced_height = 200, opacity = 0.7, clip_shape = helpers.rrect(100), forced_width = 200, halign = 'center', widget = wibox.widget.imagebox }, widget = wibox.container.background, border_width = dpi(7), forced_width = dpi(200), forced_height = dpi(200), shape = helpers.rrect(100), border_color = '#ffffff' }, widget = wibox.container.place, halign = 'center', }, { markup = helpers.colorizeText("Namish Pande", beautiful.fg), font = beautiful.sans .. " Semibold 16", align = 'center', valign = 'center', widget = wibox.widget.textbox, }, layout = wibox.layout.fixed.vertical, spacing = 10, }, { markup = helpers.colorizeText("Choose Wisely, Explorer!", beautiful.fg), font = beautiful.sans .. " Light 46", align = 'center', valign = 'center', widget = wibox.widget.textbox, }, { { poweroffbutton, rebootbutton, lockbutton, suspendbutton, exitbutton, layout = wibox.layout.fixed.horizontal, spacing = 40, }, widget = wibox.container.margin, top = 40, }, spacing = 0, layout = wibox.layout.fixed.vertical }, widget = wibox.container.place, halign = 'center', }, widget = wibox.container.margin, bottom = 80,}to make this structure a bit less confusing here what is actually happening
margin >> vertical layout| -place widget to place in center| | -vertical layout| | | -the picture| | | -the name| | -the message| | -margin| | | -horizontal layout| | | | -poweroffbutton| | | | -restartbutton| | | | -lockbutton| | | | -sleepbutton| | | | -exitbuttonAdding the background image
This is where imagemagick comes into play. But first we will have to make a widget for it
local back = wibox.widget { id = "bg", widget = wibox.widget.imagebox, forced_height = beautiful.scrheight, horizontal_fit_policy = "fit", vertical_fit_policy = "fit", forced_width = beautiful.scrwidth,}Now we will execute a command with awful.spawn.easy_async_with_shell to use imagemagick to convert our wallpaper into a blurred image. easy_async_with_shell will help us set the background image after the image has been converted
local makeImage = function() os.execute("mkdir -p ~/.cache/awesome/blur/") local cmd = 'convert ' .. beautiful.wall .. ' -modulate 50 -filter Gaussian -blur 0x6 ~/.cache/awesome/blur/wall.png' awful.spawn.easy_async_with_shell(cmd, function() local blurwall = gfs.get_cache_dir() .. "blur/wall.png" back.image = blurwall end)endmakeImage()Adding all the elements together
now we can update the exit:setup to be:
exit:setup { back, { { close, box, nil, expand = 'none', layout = wibox.layout.align.vertical, }, margins = dpi(15), widget = wibox.container.margin, }, layout = wibox.layout.stack}the wibox.layout.stack allows widget to be placed on top of each other
Listening For Keypresses
to listen for keypresses we can use the awful.keygrabber(). This will help us to execute the comands without using mouse.
local exit_screen_grabber = awful.keygrabber({ auto_start = true, stop_event = "release", keypressed_callback = function(_, _, key, _) if key == "s" then suspendcommand() elseif key == "e" then exitcommand() elseif key == "l" then lockcommand() elseif key == "p" then poweroffcommand() elseif key == "r" then rebootcommand() elseif key == "Escape" or key == "q" or key == "x" then awesome.emit_signal("hide::exit") end end,})as we want it start right after opening our widget we set the auto_start to true
Controlling the keygrabber
To start and end the keygrabber, we can edit the toggle signals as follows:
awesome.connect_signal("toggle::exit", function() if exit.visible then exit_screen_grabber:stop() exit.visible = false else exit.visible = true exit_screen_grabber:start() end end) awesome.connect_signal("show::exit", function() exit_screen_grabber:start() exit.visible = true end) awesome.connect_signal("hide::exit", function() exit_screen_grabber:stop() exit.visible = false end)Final Code
And we are done! Congratulations on making it this far! This is the full code
local awful = require("awful")local wibox = require("wibox")local beautiful = require("beautiful")local dpi = beautiful.xresources.apply_dpilocal helpers = require("helpers")local gfs = require("gears.filesystem")
local powerofficon = ""local rebooticon = ""local suspendicon = ""local exiticon = ""local lockicon = ""
local poweroffcommand = function() awful.spawn.with_shell("poweroff") awesome.emit_signal('hide::exit')end
local rebootcommand = function() awful.spawn.with_shell("reboot") awesome.emit_signal('hide::exit')end
local suspendcommand = function() awesome.emit_signal('hide::exit') awful.spawn.with_shell("systemctl suspend")end
local exitcommand = function() awesome.quit()end
local lockcommand = function() awesome.emit_signal('hide::exit') awesome.emit_signal('toggle::lock')end
local close = wibox.widget { { align = 'center', font = beautiful.icofont .. " 24", markup = helpers.colorizeText('', beautiful.err), widget = wibox.widget.textbox, }, widget = wibox.container.place, halign = 'left', buttons = { awful.button({}, 1, function() awesome.emit_signal('hide::exit') end) },}
local createButton = function(icon, cmd, name) local button = wibox.widget { { { { id = 'text_role', align = 'center', font = beautiful.icofont .. " 35", markup = helpers.colorizeText(icon, '#ffffff'), widget = wibox.widget.textbox }, margins = 40, widget = wibox.container.margin }, shape = helpers.rrect(10), bg = '#ffffff' .. '10', buttons = { awful.button({}, 1, function() cmd() end) }, widget = wibox.container.background }, { id = 'text_role', align = 'center', font = beautiful.sans .. " Bold 16", markup = helpers.colorizeText(name, '#ffffff'), widget = wibox.widget.textbox }, spacing = 20, layout = wibox.layout.fixed.vertical } return buttonend
local poweroffbutton = createButton(powerofficon, poweroffcommand, "Poweroff")local rebootbutton = createButton(rebooticon, rebootcommand, "Reboot")local lockbutton = createButton(lockicon, lockcommand, "Lock")local suspendbutton = createButton(suspendicon, suspendcommand, "Sleep")local exitbutton = createButton(exiticon, exitcommand, "Exit")
local box = wibox.widget { { { { { { { image = beautiful.profilepicture, forced_height = 200, opacity = 0.7, clip_shape = helpers.rrect(100), forced_width = 200, halign = 'center', widget = wibox.widget.imagebox }, widget = wibox.container.background, border_width = dpi(7), forced_width = dpi(200), forced_height = dpi(200), shape = helpers.rrect(100), border_color = '#ffffff' }, widget = wibox.container.place, halign = 'center', }, { markup = helpers.colorizeText("Namish Pande", beautiful.fg), font = beautiful.sans .. " Semibold 16", align = 'center', valign = 'center', widget = wibox.widget.textbox, }, layout = wibox.layout.fixed.vertical, spacing = 10, }, { markup = helpers.colorizeText("Choose Wisely, Explorer!", beautiful.fg), font = beautiful.sans .. " Light 46", align = 'center', valign = 'center', widget = wibox.widget.textbox, }, { { poweroffbutton, rebootbutton, lockbutton, suspendbutton, exitbutton, layout = wibox.layout.fixed.horizontal, spacing = 40, }, widget = wibox.container.margin, top = 40, }, spacing = 0, layout = wibox.layout.fixed.vertical }, widget = wibox.container.place, halign = 'center', }, widget = wibox.container.margin, bottom = 80,}local exit_screen_grabber = awful.keygrabber({ auto_start = true, stop_event = "release", keypressed_callback = function(_, _, key, _) if key == "s" then suspendcommand() elseif key == "e" then exitcommand() elseif key == "l" then lockcommand() elseif key == "p" then poweroffcommand() elseif key == "r" then rebootcommand() elseif key == "Escape" or key == "q" or key == "x" then awesome.emit_signal("hide::exit") end end,})
awful.screen.connect_for_each_screen(function(s) local exit = wibox({ shape = helpers.rrect(0), screen = s, width = beautiful.scrwidth, height = beautiful.scrheight, bg = beautiful.bg .. '00', ontop = true, visible = false, }) local back = wibox.widget { id = "bg", widget = wibox.widget.imagebox, forced_height = beautiful.scrheight, horizontal_fit_policy = "fit", vertical_fit_policy = "fit", forced_width = beautiful.scrwidth, } exit:setup { back, { { close, box, nil, expand = 'none', layout = wibox.layout.align.vertical, }, margins = dpi(15), widget = wibox.container.margin, }, layout = wibox.layout.stack } local makeImage = function() os.execute("mkdir -p ~/.cache/awesome/blur/") local cmd = 'convert ' .. beautiful.wall .. ' -modulate 50 -filter Gaussian -blur 0x6 ~/.cache/awesome/blur/wall.png' awful.spawn.easy_async_with_shell(cmd, function() local blurwall = gfs.get_cache_dir() .. "blur/wall.png" back.image = blurwall end) end makeImage() awful.placement.centered(exit) awesome.connect_signal("toggle::exit", function() if exit.visible then exit_screen_grabber:stop() exit.visible = false else exit.visible = true exit_screen_grabber:start() end end) awesome.connect_signal("show::exit", function() exit_screen_grabber:start() exit.visible = true end) awesome.connect_signal("hide::exit", function() exit_screen_grabber:stop() exit.visible = false end)end)And now to make it work, you can require the whole thing in your main file
require("ui.powermenu") -- or whatever your path is
Namish